Labflow & Spark: Built for Simplicity
Consider this your roadmap to navigating your Catalyst courses with ease. While any new platform can feel like a lot at first, you’ll quickly find that Labflow (for lab) and Spark (for lecture/discussion/recitation) are designed to be intuitive and straightforward.
Let’s get you oriented so you can spend less time figuring out the tech and more time mastering the material. Let’s dive in!
A Quick Note: Don’t worry if you see features in this guide that aren’t in your actual course! Labflow/Spark is highly customizable. Based on your instructor’s preferences and course guidelines, our team sets up your course to show only the specific tools you need.

General Resource Links:
- General Navigation through Labflow/Spark
- Red Banners and Errors
- Privacy Policy
- Supported browsers and systems
- Firefox browser gives security warning, cannot access page
- Accessibility and Compliance
Creating Your Account and Enrolling in a Course
You have been provided with Student Enrollment Instructions by your instructor. Please refer to those instructions for specifics regarding your school and course(s).
Enrollment FAQs
What if the "Enroll" button is greyed out?
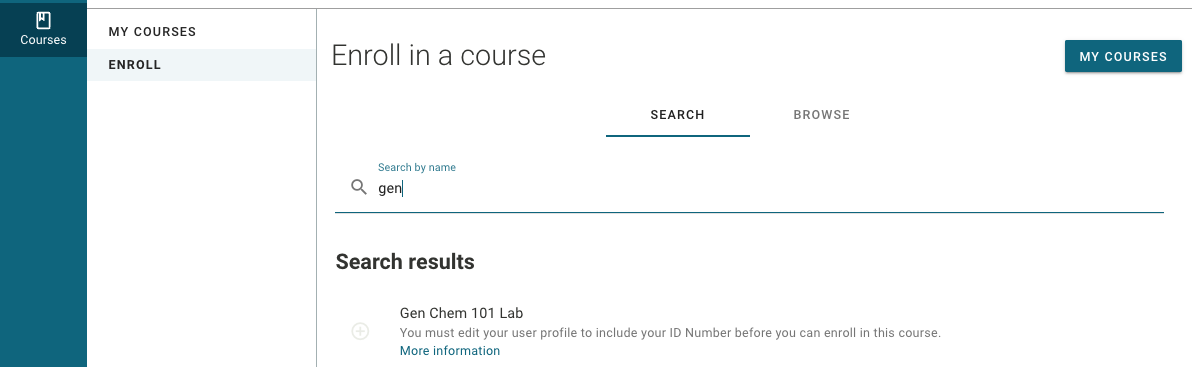
This usually means you are missing required profile information, such as your Student ID number. Navigate to the User Menu (person icon in bottom left corner) → Profile → Edit to update your details.
What if it says “Course Not Found?”
Ensure you are searching by the correct institution name or course number. If you see a message stating the course is only accessible via your school's LMS (Canvas, Blackboard, Moodle, D2L/Brightspace, etc.), you must click the Labflow/Spark link directly from your LMS course to sync your account.
What is the difference between an enrollment code and an access code?
An enrollment code is the "password" to join your specific course section. Check your Student Enrollment Instructions or ask your instructor for specifics. This code will have a maximum of 8 letters and/or numbers. It may not be 8 characters long. An access code is the 16-character code used to pay for the platform. Typically, these come from the bookstore. If you have questions about your access code, please contact the bookstore.
Can I get a refund?
Any credit card purchase of Labflow/Spark will not be eligible for a refund. Any access code refunds are at the discretion of the location which sold the code.
How do I drop the course/cancel my subscription?
If you have dropped your course with your university wish to remove yourself from a Labflow/Spark course, please let your instructor or the support team know and we can remove you from the course. We do not provide refunds on credit card purchases, so your payment cannot be refunded.
Additional Resource Links:
User Menu
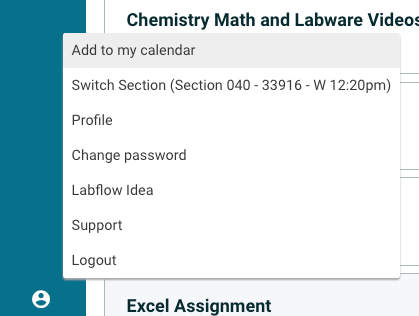
You will find the User Menu (person icon) in the bottom left corner of your screen. This is where you can update your name, email address, ID number, or password; contact technical support; add due dates to your personal calendar, and more!
Features
- Add to my calendar: Quickly add assignment due dates to your personal calendar. Highly recommended!
- Switch Section: Read the section information window and proceed accordingly. Depending on how your course is set up, your section information will look like one of these two options:
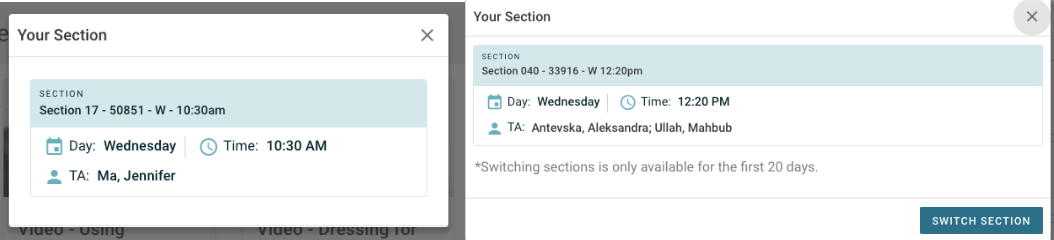
- If you are allowed to switch sections yourself, you will see an active SWITCH SECTION button. You can change sections yourself by clicking the button and selecting a new section to join.
- If you are not allowed to switch sections yourself, you will not see a button to switch sections in the pop-up window. Contact your instructor or TA/IA to change sections.
- Profile: Update your profile picture, name, and email. Note: Do not change your time zone unless you have permission, as it can affect due dates.
- Change password: In case you need to update your password, you can do it here.
- Labflow/Spark Idea: Your feedback is essential to the future of Labflow/Spark. By sharing your suggestions, you can help us enhance the platform to be more effective and engaging. We would love to hear your thoughts!
- Support: This links directly to the student support ticket portal, the same as the "?" widget. This is where you can report a Labflow/Spark technical issue. See the Technical Support/Submitting a Student Support Ticket section in this document for more details.
- Logout:Safely end your Labflow/Spark session.
- Note: If your course requires an ID number, you may not be able to enroll until updating your profile. If this is the case, you will see a message that says “You must edit your user profile to include your ID Number before you can enroll in this course” (see image below). When your instructor exports scores from Labflow/Spark and imports them into your university's LMS, your ID Number is used to match up your account in Labflow/Spark with your university account.
Additional Resource Links:
- Profile (Contact Information, Password, Calendar Feature, Support, Logout)
- Adding Labflow/Spark Assignment Due Dates to Personal Calendars
Types of Content/Activities in Labflow/Spark
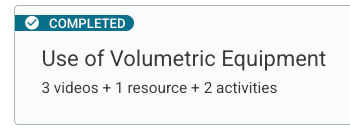
In Labflow/Spark, your material is grouped into expandable Topic Blocks made up of individual Tiles (items). To track your progress, just look at the top-left corner of any block—it will display a "Completed" status as soon as everything inside it is done.
Types of Tiles (Items):
- Label: Non-interactive text used to break up content, add brief instructions, and visually separate sections within a Topic Block.
- File: Access single files that easily open in a new tab so you can keep working without losing your place. Need a hard copy? You can download or print them anytime. You may need to view files in the course before you can open additional content—this type of completion condition will be noted wherever necessary.
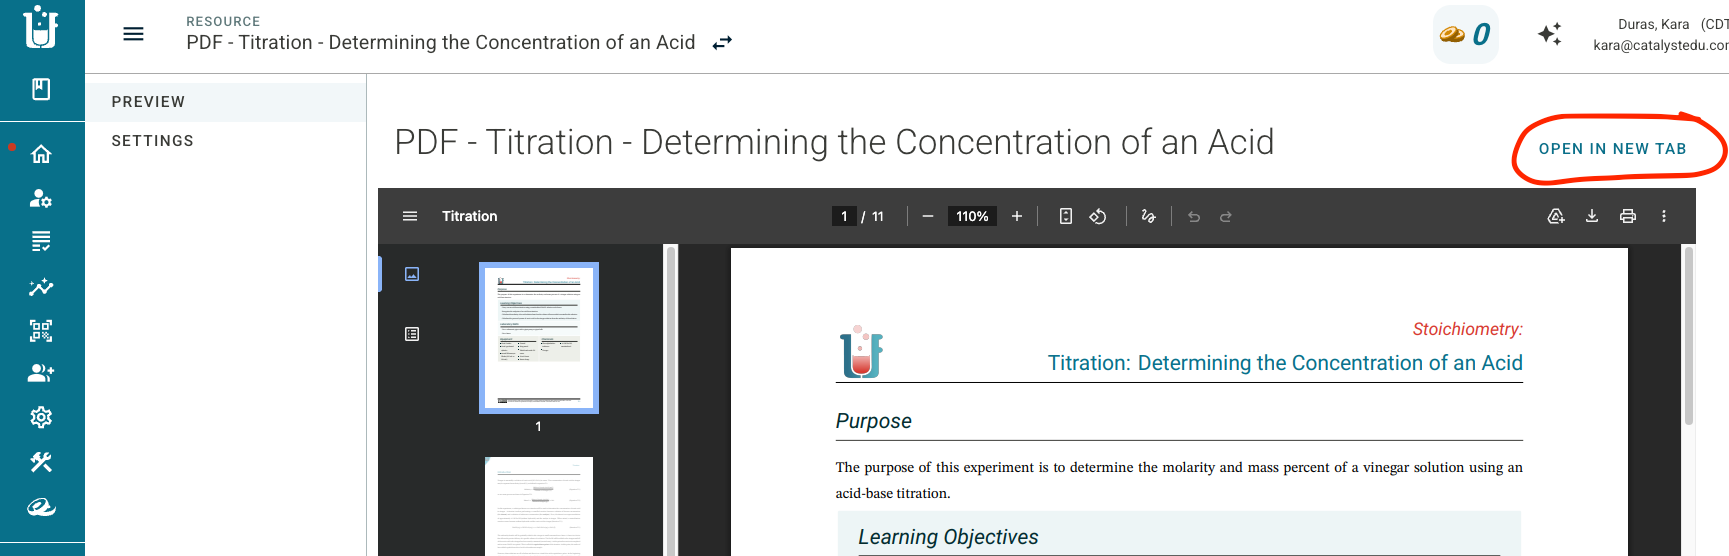
- Page: Custom text spaces where your instructor may post announcements, course notes, and helpful links or images. Like files, you may need to view pages in the course before you can open additional content—this type of completion condition will be noted wherever necessary.
- Video: Embedded video content that includes closed captioning and a transcript. Videos track your viewing completion, so you'll see a check mark (and maybe receive tokens, if enabled) once you've completed the video!
- Quiz/Homework/Exam: Test your knowledge with these auto-graded assignments. You’ll see a mix of question styles—including multiple-choice, matching, short answer, and fill-in-the-blank—and get your results right away. Quizzes may have completion conditions like submitting an attempt, or achieving a certain score, in order for the quiz to be "complete," and these conditions will be noted at the top of the assignment.
- Report: These are comprehensive digital reports or check-ins. More than just a quiz/homework/exam, they are interactive spaces where you will enter data, perform calculations, upload files, and/or write short essays. Reports may also have completion conditions like submitting an attempt in order for it to be considered "complete," and these conditions will be noted at the top of the assignment. Reports go by a variety of names (assignment, submission, split into two parts:
- Validated Section: An auto-graded area for entering your data. These items are confirmed before you proceed into the Graded section.
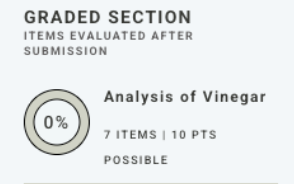
- Graded Section: A section for manual grading, where you can upload files and submit longer responses for your grader to review. These items are evaluated after you submit the assignment.
Reports
Validated Section (Data Entry)
- Follow formatting rules: When entering numerical data, pay strict attention to the required number of decimal places or significant figures. If your formatting is incorrect or outside the expected range, the system will give you an error message and block you from moving forward until you fix it.
- Checkpoints/Attendance: Depending on your course, you might see a QR code appear in your report. When this happens, it means you've hit a checkpoint! You will need your TA/IA or instructor to scan your screen to unlock the rest of your lab.
- Locking your data: Before you click Proceed, take a quick second to review your work! Once you click Proceed, your raw data is locked in. If you accidentally submit a typo, don't panic—but you will need to ask your TA/IA or instructor to manually send your report back to the data entry step so you can fix it.
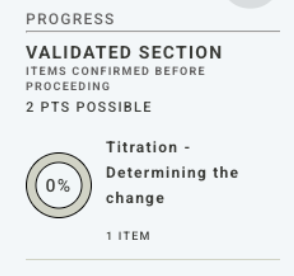
Graded Section (Calculations, Open Response)
- Math and written answers: You will use your locked data to solve calculations. You can enter numbers using scientific notation, but follow rounding rules for significant figures. For essay questions, use the text toolbar to format your answers (like adding superscripts and subscripts).
- File Uploads: For file upload questions, you should first download the file to your computer and then upload it using the upload button. Do not copy/paste or drag and drop files directly from your email account. They will not show up to other users, like your grader.
- Submitting: Unlike the Data Entry section, you can skip around between questions here. Make sure to submit your work before the deadline. If the cut-off date passes, Labflow/Spark will automatically submit whatever progress you have saved on your screen.
Scientific Notation
- Use "e" or "E" with no spaces, or use "x10" with a caret. Read more about entering answers in scientific notation in reports here.
- Correct: 1.23E-4, 1.23e-4, or 1.23x10^-4.
- Incorrect: 1.23 E-4 (space) or 1.23E^-4 (using a caret with E).
Subscripts and Superscripts
- For text responses (like chemical formulas), use the dedicated X_2 (subscript) and X^2 (superscript) buttons in the editor toolbar. Do not copy-paste formatted text from other programs, as this often causes errors.
Provisional Data in Reports
- If enabled by your instructor, provisional data is typically found in the very first question of the Validated (Data Entry) section of a report. You will usually see a dropdown question asking "How will you collect data for this experiment?" Selecting "virtually" will provide you with the provisional data. Note: You need permission from your instructor/TA to use this functionality.
- Provisional data is pre-filled, randomized data that may be provided to students who are unable to perform a lab experiment in person.
Being Sent Back to Data Entry in a Report
- What it means: Being sent back to data entry means your report gets unlocked and returned to the very first section (the Data Entry section) without deleting any of your previously saved work.
- Why you might need this: If you realize you entered incorrect data/made a typo after you already moved on to the calculations section or need to switch whether you are completing the lab/class in person or virtually, this allows you to go back and update your original data. This is helpful because starting a completely new attempt would lock your previous data and wipe out your calculations.
- Who can do it: You cannot do this yourself. You must ask your TA/IA or instructor to send your report back to data entry.
- Important step: The "Review" button: Once your TA/IA or instructor sends you back, you must click the Review button located at the end of the data entry section. If you do not click this button, your original data will remain locked, and you will not be able to actually edit your numbers before proceeding to your calculations.
Saving Answers in a Report
- Labflow/Spark automatically saves your work in the background as you type your answers, upload files, or click between questions.
- There is no specific "save" button you need to click. To work on your report later, simply close the page or log out. You can reopen the assignment to pick up exactly where you left off as long as the assignment's cut-off date has not passed.
- Just make sure you do not click "Submit" until you are completely finished. If you forget to click submit, Labflow/Spark will automatically submit your saved progress for you when the cut-off date is reached.
How do I know that I have submitted my report?
- You can verify your report submission in two ways:
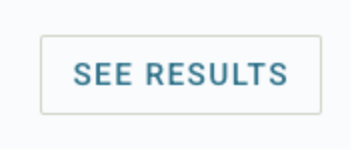
- The Course Home Page: Look for the "See Results" button located to the right of the report tile. Clicking this will take you directly to your submitted data.
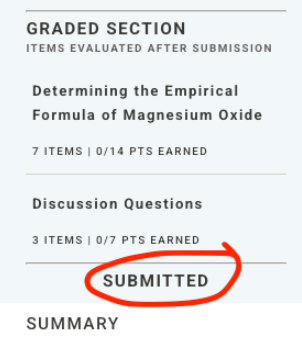
- Within the Report: Open the report and check the progress bar on the side of the screen. If the submission was successful, the status at the bottom will clearly display "Submitted."
Additional Resource Links:
- Attempting and Submitting Quizzes
- Entering answers in scientific notation in quizzes
- Troubleshooting issues with submitting reports
- Reports using provisional data
- Working with images and files in essay responses
- Entering answers in scientific notation in reports
- Cannot upload or insert files and images: Clicking on upload icon and nothing happens
- The ability to add files and images has been temporarily disabled
Multiple Attempts on an Assignment
To use a second attempt (or beyond), simply reopen the assignment before the cut-off date and choose to start your new attempt. This is only applicable to assignments with multiple attempts enabled. Check your syllabus or ask your instructor if you are unsure of how many attempts you are allotted.
Here is what to expect depending on the assignment type:
- For Quizzes/Homeworks/Exams: You will start a fresh attempt. If your instructor has set the quiz to "homework mode," you may instead see a "Try Again" button immediately after getting a question wrong.
- For Reports: The information you inputted in the Validated (Data Entry) Section will be permanently locked and carried over from your first attempt. However, the Graded (Calculations) Section will be completely wiped clean. You must redo all of your calculations and open-ended questions using your locked data. See the "Being Sent Back to Data Entry in a Report" portion of this guide for more information.
When I submit a second attempt on a report, do I receive the highest grade or the grade of the last submission?
- Much like everything else, this setting depends on your instructor’s specific course policies. Check your syllabus or ask your instructor.
Understanding Due Dates in Labflow/Spark
Definitions of Due Dates
- Open Date: This is when the activity becomes available for you to start working on it.
- Close Date: This is the primary due date. Work submitted by this date is considered on-time.
- Cut-Off Date: This is the final deadline. Any work submitted after the close date but before the cut-off date is considered late and may incur a penalty if the instructor has chosen to do so. Sometimes the close and cut-off dates are the same; in this case, there is no late penalty. Any unstarted work not submitted by the cut-off date will be automatically submitted and graded as a zero.
Where to Find Due Dates
- Course Home Page: The open and close dates are displayed directly on the activity tiles for assignments.
- Assignment Page: When you click into a specific assignment, the exact open, close, and cut-off dates are listed on the initial landing page before you begin your attempt.
- Calendar Integration: You can navigate to your Profile/User Menu and use the "Add to my calendar" button. This allows you to export your assignment deadlines to your personal calendar so you can easily track due dates and receive notifications. Highly recommended!
Access Restrictions on Assignments
Your course may require you to complete certain activities before unlocking the next ones. For example, you might need to watch a video, read a document, or complete a specific quiz before a homework assignment or report becomes available.
If you try to click on a locked item, a popup message will tell you exactly which prerequisite task you need to complete first.
QR Codes/Attendance Feature
Depending on your course, QR codes may be used to verify your attendance, approve visual data, or check your experimental techniques. If your course uses them, here is how they work:
How to Get Scanned:
- Display your code: Open the unique QR code on your device screen within the report.
- Get approved: Have your TA/IA or instructor scan your screen using their phone or tablet.
Once successfully scanned, a green checkmark will appear on your screen, allowing you to click "Next" and continue with your assignment.
Gradebook
The Gradebook is your central hub for tracking performance and monitoring progress throughout the semester. However, if your course is linked to the university’s LMS, the Gradebook in the LMS is considered the source of truth for your grades. Here is a breakdown of how to navigate your scores in the Labflow/Spark gradebook, if applicable, and what the different indicators mean.

Key Features
- Performance Tracking: View earned points, overall percentages, and scaled scores for every quiz and report all in one place.
- Direct Access: Every assignment listed is a clickable link, allowing you to jump directly to your work for review.
- LMS Synchronization: If your course uses an LMS integration (e.g., Canvas, Blackboard, Moodle, D2L/Brightspace, etc.), Labflow/Spark syncs your finalized scores to your primary university gradebook when your grades are posted.
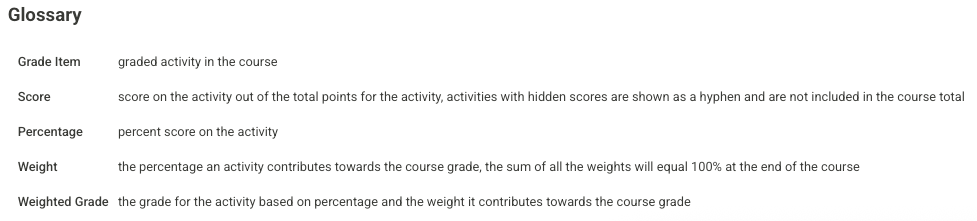
- Built-in Glossary: Need help decoding? Check the glossary at the bottom of the page for quick definitions.
Understanding Your Grades
The gradebook provides specific status updates to keep you informed:
- Pending: Your work has been submitted and is currently being reviewed by your grader.
- "-0-" vs. "0.00": A dashed zero (-0-) means the assignment was never opened/started, whereas a standard "0.00" indicates the work was completed but did not earn points.
Pro Tip: If you notice a missing grade, please reach out to your instructor or grader directly. Keep in mind that instructors may occasionally hide specific columns or assignments from view, so your gradebook may not always display every item simultaneously.
Helper Bot
Helper Bot is an AI-powered chatbot integrated into Labflow/Spark that is designed to provide immediate, on-demand support for students, TAs/IAs/LAs, and instructors 24/7. It offers answers about technical issues, enrollment, and platform navigation.
How to Use Helper Bot
- Accessing Helper Bot:
- From the My Courses Homepage: Click the sparkle icon located next to your name and email in the top-right corner. This version provides general technical support.
- Within a Specific Course: If the instructor has enabled it, click the sparkle icon located next to your name and email in the top-right corner. This version provides technical support for your course and may provide additional information if provided by the instructor.

- Asking Questions:
- Technical Support: Use the prompt area to ask questions about Labflow/Spark functionality, such as how to enroll in a course, change your section (if applicable in your course), submit a support ticket, enter scientific notation, or understand supported file types.
- Course-Specific Information (if enabled): If the instructor has grounded course materials (like the syllabus, lab manual, or FAQs) in Helper Bot, you can ask questions about course policies, due dates, office hours, or what to do if you miss a class/lab. The bot will provide answers based on the enabled documents.
- Limitations:
- While Helper Bot handles general questions, it can’t assist with homework or specific course material. For content support, your instructor and teaching team (TA/IA/LA) are your best resources—please reach out to them!
Technical Support/Submitting a Student Support Ticket
Before you submit a ticket, try these troubleshooting tips:
- The "Fresh Start" Reset: Sometimes the easiest fix is just logging out and back in! Give it a quick reset by using the link for your country (below). Then, log back in either directly on the website, or through your LMS (e.g., Blackboard, Canvas, Moodle, D2L/Brightspace, Sakai, etc.) if your LMS course is integrated with Labflow/Spark.
- Students in the United States: https://courses.catalystedu.com/reset
- Students in Canada: https://courses.catalystedu.ca/reset
- Troubleshooting Connectivity: If you are experiencing WiFi issues, try the following:
- Restart Everything: Power cycle both your device and your router.
- Change Locations: Move closer to your router or away from potential interference (like thick walls or other electronics).
- Update your Domain Name Server (DNS): If you have a strong signal but slow speeds, consider changing your DNS settings. A slow DNS handshake can make even fast connections feel sluggish.
If your issue persists after trying these tips, please submit a Student Support Ticket for assistance.
How to Submit a Student Support Ticket
You have two primary methods for submitting a ticket:
- Use the In-App Support Widget
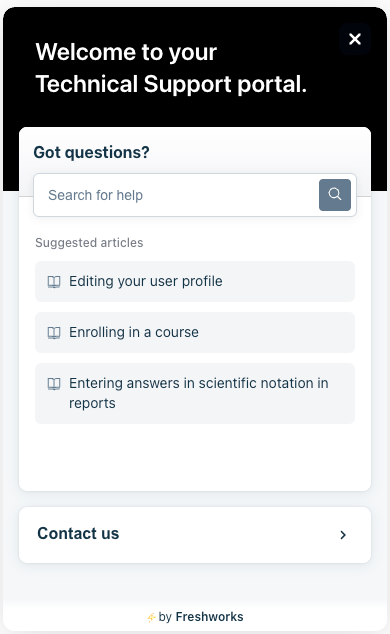
- You should click the question mark icon (?) in the bottom-left corner of the screen.
- A support widget will appear, where you can describe your issue.
- Pro-Tip: You should include a screenshot or screen recording containing the URL and your name/email in the top right corner, if applicable. This helps the support team resolve issues much faster and automatically includes key course and assignment information.
- Responses to the ticket will be sent to the email address associated with your Labflow/Spark account.
- Send an Email Directly
- You can also send an email to the dedicated student support address.
- Email us at: support@Labflow.freshdesk.com
- This email address is also available on the last page of the Student Enrollment Instructions for the course.
- Responses to the email will be sent to the address from which you sent the message.
- You can also send an email to the dedicated student support address.
Additional Resource Links:
Token Economy
Note: This feature is optional, and the specific ways you can earn and spend tokens vary by course.
We know semesters can get overwhelming, which is why the Token Economy is here to give you a little extra flexibility. When you stay on top of your game—like finishing prep tasks or acing knowledge checks—you earn tokens. You can then use those tokens to buy flexibility when you need it most, whether that means extending a deadline or getting a second chance on an assignment.
Depending on your course rules, you can use these tokens to extend a deadline when life gets busy, or retry an assignment to fix a mistake. You don't have to explain your personal situation to anyone; you have the autonomy to manage your deadlines, reduce stress, and focus on what matters most: truly learning the concepts!


Automated Token Earning and Spending
The Labflow/Spark token economy is mainly automated, allowing token earning and spending opportunities to be tied directly to videos and assignments. Transactions take effect instantly, so you can redeem your tokens right away without needing to wait for manual approval.
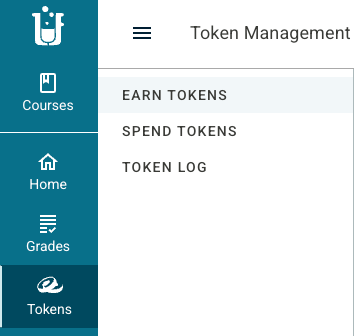
If you click on the token icon, you will see the following tabs:
- Earn Tokens: You can see what actions earn tokens.
- Spend Tokens: You can see what extensions or retries cost.
- Token Log: You can see a record of your token earning/spending.
Custom Token Requests (Manual)
- Purpose: This feature allows instructors to reward non-automated student behaviors (e.g., engagement, preparation, or service).
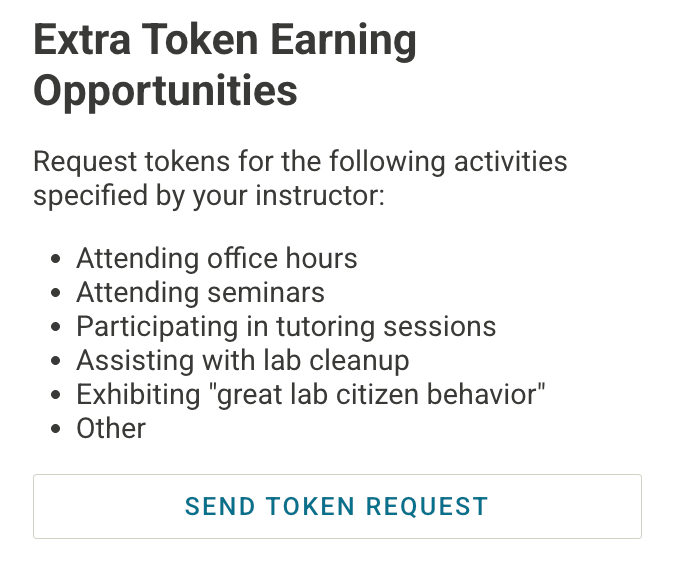
- Examples of Use: Typical behaviors rewarded include attending office hours, attending seminars, participating in tutoring sessions, assisting with lab cleanup, or exhibiting "great lab citizen behavior.”
- How to Submit a Token Request:
- If enabled, you can access these options in the "Earn Tokens" dashboard under "Extra Token Earning Opportunities."
- When submitting a request, you will be prompted to include a note or proof for the instructor to review (e.g., a short summary of the activity).
- Approval Process (Instructor-Only):
- All custom requests must be manually reviewed, approved, or denied by the instructor.
Token Economy FAQs
When can I purchase an extension?
You can purchase an extension if it is enabled in the settings for that assignment, and the cut-off date has not passed. When you purchase an extension for an assignment, this extends both the close date and the cut-off date by the amount of time configured in the settings for the report. So theoretically you could be late (after close date), but through purchasing an extension, then submit on time. Once the cut-off date passes, you are unable to purchase extensions.
How many extensions can I purchase?
If extensions are enabled in your course, the limit is 1 per assignment. No matter how your course is set up, you can only purchase a single extension for any given assignment. Once you use it, the "Extend Deadline" button will be grayed out and cannot be clicked again.
Note: Remember that token rules vary, and your instructor may choose not to offer deadline extensions in your course.
How many "free" attempts can I have before I have to use tokens?:
When tokens are enabled for retries (spend X tokens for 1 retry), you only have one free attempt.
Additional Resource Links:
Group Work
The Group Work feature allows you to collaborate with peers on reports. This may or may not be enabled in your course.
Using Group Work in an assignment
- Joining Your Group
- The Mandatory Modal: When you first open a report with group work enabled, a pop-up will appear. You must select your group number to proceed into the report.
- See Your Team: Once inside, you can click the Group Tab to see the names of other students who have joined your group.
- Switching Groups: You can change your group selection at any time before you hit the final submit button.
- Completing the Work
- Please default to the assignment instructions and your TA/IA or instructor instructions on how to complete the assignment.
- Note: If the report includes "Data Entry" validation, every student must enter their own data to pass the validation check, even if one person is doing the final calculations.
Additional Resource Links:
Course Policies
If you have questions regarding any of the following policies in your course, please reach out to your instructor for clarification:
Assignments & Grading
- Deadlines: Specific due dates and policies regarding late penalties.
- Attempts: The number of times you may submit or retake an assessment.
- Scoring: Grade weighting and specific criteria for how work is evaluated.
- Review Settings: Timelines for when feedback and grades become visible.
- Assignment Setup: Quiz/homework/exam and report structure.
Course Mechanics
- Tokens: Opportunities for earning and spending tokens, including costs and the duration of extensions.
- Completion Requirements: The specific criteria needed to mark an assignment as "complete."
- Access Restrictions: Prerequisites or dependencies required to unlock subsequent course materials.
- Feature Settings: Specific tools or functionalities enabled within this course.
Go Forth and Ace Confidently!
You’ve got the strategy and the tools—now, take the lead on your own success!
You just mastered the essentials of Labflow/Spark. Remember, every power user started exactly where you are. Take a deep breath and trust your prep; you now have the foundation to navigate your courses with ease, stay ahead of the curve, and actually enjoy the process.
The more you dive in, the more intuitive it becomes. We’re excited to see you in action and confident you’ll be a pro in no time!

Was this article helpful?
That’s Great!
Thank you for your feedback
Sorry! We couldn't be helpful
Thank you for your feedback
Feedback sent
We appreciate your effort and will try to fix the article